
Ultimate Guide To Wainscoting (with Pictures!)
There are very few trim carpentry projects that can add so much character and elegance to a room or hallway the way that wainscoting can.
Have you wanted wainscoting for a long time but you thought this is not a DIY project? Perhaps you had design questions that stopped you from going ahead? We’re going to help with all of that!
What is Wainscoting?
According to the dictionary, wainscoting is wooden paneling going around the walls of a room. That’s true enough. But, there are loads of different styles of wainscoting.
Types of Wainscoting
Before we get into “how to” you’ll need to decide which style of wainscoting you’d like. There are a lot of wainscoting styles to choose from!
The most common types of wainscoting installations are applied onto the drywall (so, no mess from taking sheetrock off walls).
- Chair Rail and Picture Molding applied onto Sheetrock to suggest panels
- Chair rail, flat-stock lumber and baseboard applied on Sheetrock to suggest rails, stiles and recessed panels
- MDF Bead board ¼” thick panels plus cap molding, corner molding and baseboard molding
- Tongue and groove bead boards (⅝” thick) with cap molding and baseboard
- Backer panel applied to the wall surface plus rails, stiles, chair rail and baseboard to create a recessed panel
How to install wainscoting
There can’t be one all-encompassing “wainscot installation guide” because there are some many variations of wainscoting. And each space is different.
But I’m going to share with you the tips you’ll need so that you can decide on the best design, the best layout, and the best materials to suit your budget, your home and your time!
What is the difference between wainscoting and beadboard?
This question comes up all the time! Beadboard can be used as wainscoting but it’s not the only type of wainscoting there is.
Wainscoting refers to decorative wooden panels, moldings to simulate panels or beadboard, lining interior walls. Wainscoting has been used for centuries to add decorative touches, to help to protect the walls, and in the past to fight dampness. Nowadays wainscoting is used for decorative purposes.
Beadboard can be a style of wainscoting. And beadboard is also used in other ways – especially as a ceiling material. on ceilings. In some older homes you’ll still find covered porches with a beadboard ceiling.
Sound good? Then let’s dig in.
How To Design The Right Wainscot for Your House
A great DIY project is always equal parts great design and great execution.
So, before we get into the details of how to assemble and install wainscoting, let’s talk about some of the design principles you’ll want to consider.
Most of the design principles apply regardless of which type of wainscoting you decide to install. I’ve spent many hours with architects, designers and homeowners to arrive at the perfect wainscot height, panel sizes and more for that client’s home.
Let’s look at some of the same details that design professionals look at and share with you what the pros do to solve them. We’re going to look at:
- Overall height
- Working with window openings
- Integrating door openings
- Choosing the layout of the panels
- Materials and details
- Proportions
1. What is the right height to install wainscoting?
The rule of thumb is that the wainscoting should be installed at ⅓ of the height between the floor and ceiling.
So, if your ceiling is 96” above the finished floor then ⅓ of that would be 32”.
But keep in mind the one-third rule is just a rule-of-thumb! It’s only one factor to consider when you’re deciding on the right height.
2. How will the wainscoting meet your windows and doors?
If you plan to install wainscoting on an outside wall, you’ll need to take windows into account. And this is one of the reasons you might deviate from the ⅓ rule.
The windowsills in some homes might be close to the ⅓-rule height off the floor. So, what should you do if the windowsill and the wainscot height are close to one another but they don’t line up? This is a perfect reason to deviate from the rule-of-thumb.
Let’s look at a real world example.
What should you do if if the windowsills are 31” off the finished floor and the wainscoting ⅓ height is 32” above the finished floor?
If you follow the rule-of-thumb, the windowsill will be one inch below the top of the wainscoting. This could look like a design error. When two important lines of moldings are close but don’t align, move them further apart.
In this case, make the wainscoting higher. Even an inch higher will make a difference. Your eye will pass over the wainscot, then see the windowsill and move on. They’ll be two separate features.
But if they are close to one another the eye might stop for a moment. And even if you don’t know why, you know something isn’t quite right. So, raise the wainscoting. Make the alignment different enough so that it’s clearly a deliberate design choice.
3. How to install wainscoting around door openings
This is a design challenge that comes up all the time!!! If you’re installing wainscoting on a wall with a door opening, there are two design challenges into account.
Design Challenge #1
Unless the door opening is centered on the wall, the panels on either side won’t be equal to one another. Don’t lose any sleep over this. Either the panels will vary in size or you’ll have more panels on one side of the door than on the other.
Feel free to experiment with the size of the panels to find what works: take electrical outlets into account. You might even want to take furniture layout into account!
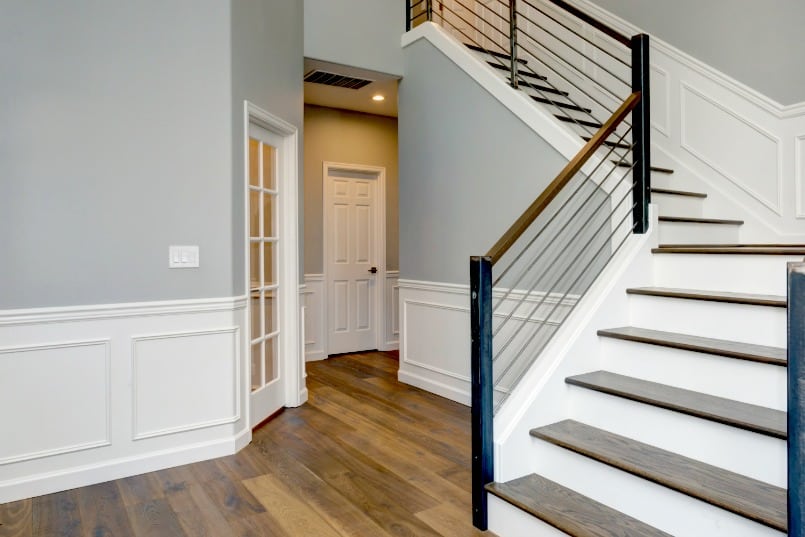
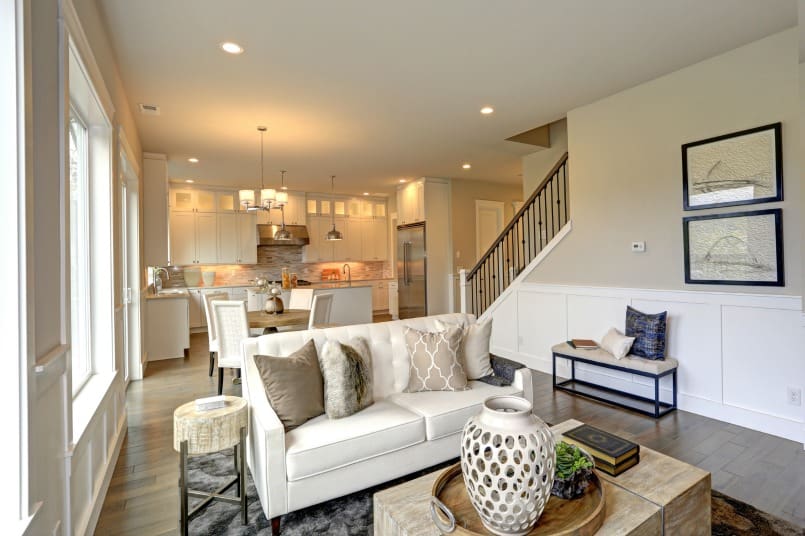
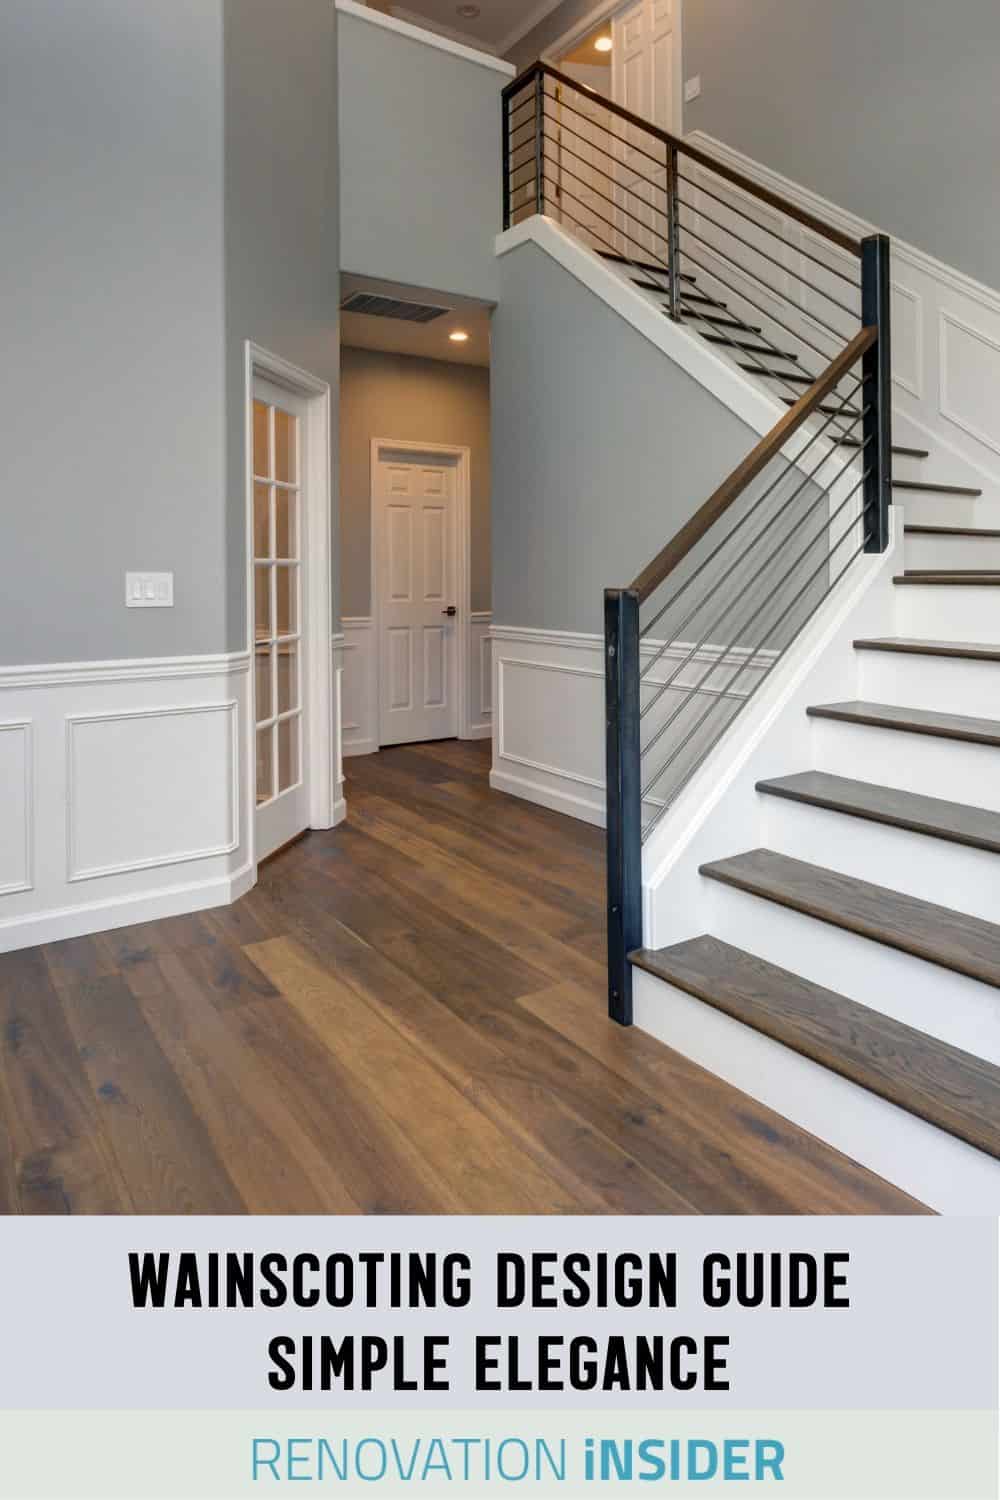
Don’t change the distance between the panels (or in the case of the Great Room image, don’t change the width of the stiles): whether we’re talking about the space between picture moldings that make the simulated panels or the stiles that make your recessed panels, keep them uniform.
Design Challenge #2
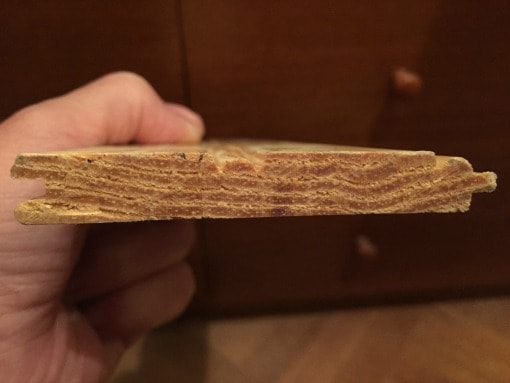
The other challenge is the thickness of the molding at the top of your wainscot compared to the thickness of the casing around your doors and windows.
Most houses built in the last 50 years have casings that are ⅝” or ¾” thick. If the molding at the top of the wainscot is wider than ¾” it will stick out beyond the casings. That can look awkward. But the solutions you come up with for these awkward details are also the details that can set your house apart.
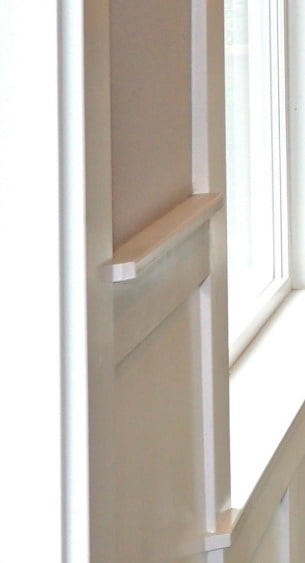
That’s one of the simplest solutions. Another solution would be to make a curved transition instead of an angled one. Feel free to experiment with your own ideas as you choose your moldings. Your goal should be to make it look very natural. The right solution for you will depend on the molding profiles your working with.
Let your creativity shine with those little details. Have fun with them!
4. How do you choose the right layout for wainscoting
Because wainscoting is so versatile, you almost can’t make a mistake!
With simulated panels or batten panels you can make the panels square or rectangular. They can be very long so that you have only a few in a room. Or they can be short so that you have many more panels. You can change panel sizes as you need to when you’re working around features such as door openings.
There are no hard and fast rules for panel width versus height.
No single design rule will guarantee you the perfect proportion between the length and height of panels. Trust your instinct in what looks right. The choice is yours!
And remember, you don’t even have to install wainscoting on every wall in a room.
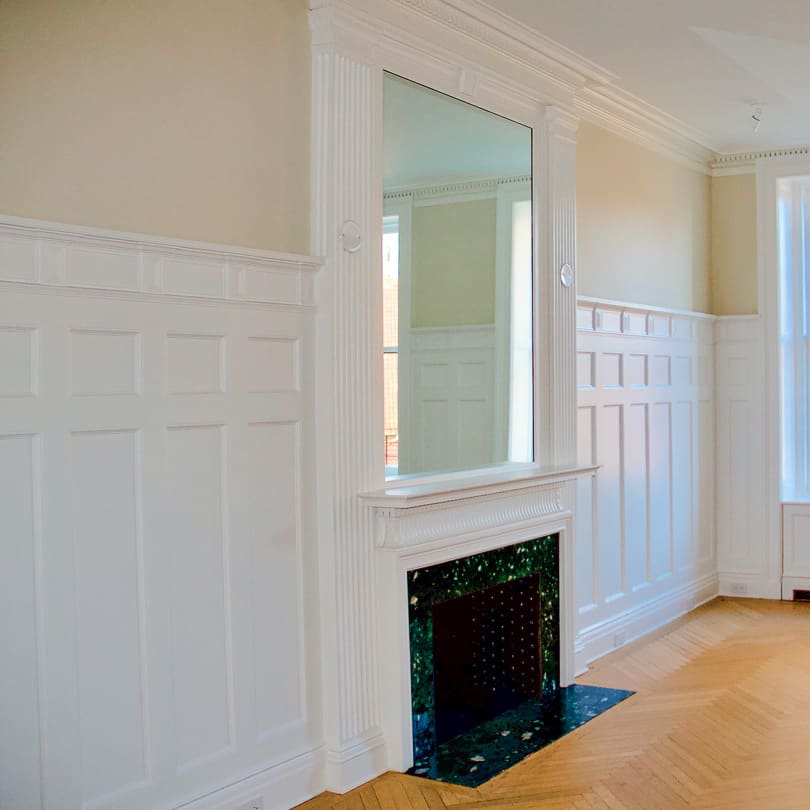
One of the cool things about wainscoting is that you can use it on just one wall and it’ll look great. For instance, if one of your walls is going to display lots of family photos, a wainscot draws the eye to that space. It’s similar to the way a fireplace mantle draws people in to view photos or art. And that wall space is invitingly set apart from the rest of the room.
With MDF bead board panels, you don’t have to make as many decisions about the size and layout of panels. Your big layout decision will be whether you want to begin with the first full width panel centered on a wall or you begin with a full panel at one end of a wall.
Here’s how to make that decision: do your layout so you avoid having just a sliver of a beaded board at either an inside or an outside corner.
Beadboard suits smaller and informal, spaces:
- the mudroom
- powder room
- or the breakfast nook.
Perhaps you have a wall surface that runs from an inside corner to a door casing. The distance between the corner and the casing is 47-1/2″ and your panels is 48″ wide.
In this case there are two design options:
Design option #1
The easy one is to cut 1/2″ off the end that will go into the corner. The simulated board in the corner will be 1/2″ narrower than all other boards. But this type of wainscoting installation makes this detail look just fine. It’s an informal material. Your eye doesn’t expect perfection of layout.
Design option #2
The second choice is to cut 1/4″ off each end of the panel. Then the two end boards will be of equal width.
How Do You Deal With A Wall Longer Than Your Panels?
You can also have the opposite challenge: the wall is 49″ long. That’s one inch wider than your 48″ panel. Now what?
It would be a bad idea to install just a 1″ wide piece of a material that’s only 1/4″ thick.
Instead, use two panels. Cut one of them to 36″ and the other to 13″. (Those dimensions are approximate.)
Always make your cuts on a bead not on the flat portion of the board when you’re cutting MDF bead board. That’s the best way to make the cuts disappear.
Summary
In general, it’s best to begin with full boards at an outside corner or a door casing and work your way to the inside corners. So long as you won’t have a sliver in the corner, plan to make your cuts in the inside corners. Therefore measure the wall first.
You don’t want to start with a full board at one end and need only a 1/2″ sliver of a board at the other end.
If that happens, go back to the first board and cut it down so that the boards on either end are equal to one another. This is why it’s so important to do your layout before you buy materials!
Guide to wainscoting Layout – Designing the Space
By now you know there is a lot of layout work before you can get started. And unless you are comfortable creating a scaled drawing like an architect, you’ll spend some time marking walls to come up with the perfect layout.
PRO TIP: Here’s a great hack for making layout marks on walls without damaging your walls.
Stick a length of blue tape along the length of the wall you want to work on. Then stick a length of masking tape onto the blue tape along its length. Your pencil marks will show up very clearly on the masking tape. And you can add more layers of masking tape as you make adjustments to the layout.
When you’re done, just peel away the blue tape, the masking tape come off with it and your wall is left without a mark on it!
Layout Example
Imagine there’s a wall with no door or window openings.
- Measure the length of the wall.
- For this example let’s say the wall is 144″ long.
- Divide that by two to get the mid-point.
- Now measure 72″ in from one corner, mark the masking tape with the centerline.
- Put a large “C” through the centerline to remind you later that it’s the center line and not some less important layout line.
- Decide if you want to have a panel centered in the room or have the gap between (the stile) centered on your room.
- Also decide how wide the gap between the panel moldings will be.
The panel centered in the room means you’ll have an odd number of panels. The stile centered in the room means you’ll have an even number. Let’s assume you’ve decided that an odd number of panels works best for you. And let’s also assume you intend to have 3″ between panels.
- Begin by marking 3″ in from each corner on your tape. You’re left with 69″ from the “simulated stile in the corner to the center line of the wall.
- If you’ve chosen to have 5 panels in total, then each panel will be 25-3/8″ wide.
- If you’ve decided that three panels is the perfect layout for you, with 3″ stiles each panel will be 43″ long. The added bonus is that the fewer panels, the less work!
How Do You Decide on the width of the top and bottom rails
Start by making the top rail the same width as the stile between panels.
Then use that same dimension for the bottom rail. You can vary from that don’t make the top rail look wider than the bottom rail.
Apply tape to show the layout of ALL PANELS. Step back and decide how you like it. Move the tape until you find the perfect layout for you.
DON’T SKIP THIS STEP!!
Ok, I know layout sounds painful! But taking the time to plan your layout is going to save you TIME, MONEY, and HEARTACHE.
Think about it this way. Fixing a problem is a lot easier when all you need to do is to move a piece of tape. Things get a lot harder and costlier to fix when you catch your mistake after the fact. Because you can only fix those mistakes with hammers and pry bars or other messy tools.
So, take your time. Get the layout right, and the rest of the project will go a lot smoother.
PRO TIP: Don’t plan to do your installation on the same day as you do your layout. There are two reasons. First, you’ll be inclined to rush the layout so that you can get on with installation. Second, you need to complete the layout to calculate the right quantity of materials you will need.
What Are The ‘Right Proportions’ For Wainscoting?
Wainscoting is a classic detail. It’s been around for centuries.
And that’s a good thing because it takes out a lot of the guesswork for you.
Wainscoting Proportions – Rule #1
The chair rail molding at the top of the wainscot should be less wide than the baseboard.
Wainscoting Proportions – Rule #2
The stiles and rails should equal one another.
Let’s look at some specific examples (here I’ll insert a very basic sketch to show what proportions work).
Wainscoting Proportions – Rule #3
There are no set rules for height versus length of the panels.
The ‘right choice’ depends on:
- the room
- the available space
- what works for you.
You don’t have to rigidly adhere to the classic proportions to make sure the space will flow well and look good.
What are the best materials to use to make your own wainscoting?
There is no one ‘best style’ of wainscoting and there is no one ‘best material’. Your materials depend on which style you choose to install.
The least expensive wainscot detail is to use a chair rail molding and a picture molding (not to be confused with a picture-rail molding). You can use this to create the simulated panels below the chair rail.
Always buy at least 10% extra when making up your quantity list!
Painted Finishes
For painted finishes, you can buy moldings in pine, poplar or MDF. You can usually buy them primed which saves a step later on.
Plywood or MDF
Another way would be to apply a birch plywood backer panel to the wall surface and then attach the rails, stiles and panel moldings to the plywood.
This sketch shows a formal use of wainscoting.
SUMMARY OF MATERIALS
Your materials will vary – depending on the style of wainscoting you choose.
Tools You’ll Need To Install Wainscoting
Here are the tools you’ll need for the installation.
TOOLS
- Power miter saw
- Pneumatic nail gun
- Orbital Sander (if you’re using flat stock) or sanding block
- Laser level (or a 4’ level and a 2’ level)
- Caulking gun
- Utility knife
- Chair Rail
- Picture molding
- Nails
- Construction Adhesive
- Caulk
- Paint (sheen)
- Blue tape
Tips On Wainscoting Installation
Ready to start installing?
These essential wainscoting installation tips will help you plan and execute your project like a pro!
Chair Rail & Picture Moldings (EASIEST)
This is a great choice for an easy and elegant wainscoting. You can transform a room in a matter of hours with this elegantly simply solution.
If you’ve already done the layout work you can get right into cutting and fitting.
APPLICATION
- Begin by installing the chair rail molding.
- Cut the chair rail to length.
- Check that the pieces fit properly
- Apply a generous bead of construction adhesive on the reverse side of the chair rail molding along its length.
- Secure it to the wall with small nails.
If your wainscot installation includes inside corners, you’ll have a choice about how to cut the chair rail. You can miter the two pieces of chair rail to fit against one another in the corner. That’s the easiest and quickest way.
Best practice is to cut one of the moldings full-length to go into the corner with a square end-cut and then cope the next chair rail against that one.
Although you can use small finish nails, a nail gun will make the work go faster. It’s likely to be more accurate and will impart less vibration to the wall than a hammer and nail will.
All of the vertical pieces of picture molding will be equal in length. Save yourself lots of time: set up a stop on your saw to make sure that all of those vertical pieces will be exactly equal to one another in length.
SIZE: You can make picture molding panels any size you want to. This makes it easy to plan for and around electrical outlets or any other features along the wall.
HEIGHT: The height of the wainscoting is your choice but it looks best if you keep it low or align it with some other element in the room.
Window sills are a perfect example: don’t install the wainscoting within an inch or two above or below the windowsill. It will look like a design error.
APPLICATION: This one is made by applying picture-frame molding and chair rail directly to your wall surface with adhesive and nails. You won’t have the luxury of hitting a stud every time. Plan to drive your nails at an angle to help hold the molding tight against the drywall until the adhesive dries.
PRO Tip: Longer panels means fewer panels. Less work for you!
Beadboard Panel + Baseboard and Cap Rail (EASY)
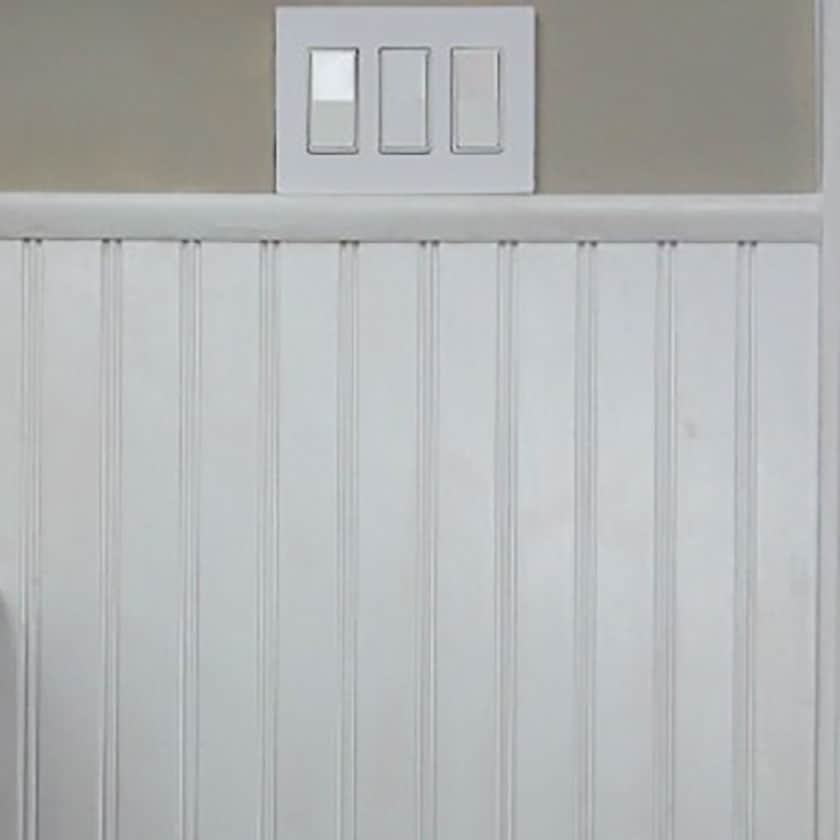
Your local lumber yard, Home Depot or Lowes all sell ¼”-thick beadboard panels in a variety of sizes. This material is ideal for informal areas of your house. Don’t install it in areas where it will be exposed to moisture.
Look for a chair rail and baseboard that has a notch cut to accept the thickness of the beadboard panels. You can make the notch yourself if you have to.
The layout of the Beadboard Panel + Baseboard and Cap Rail is a breeze.
The panels are precut and so you don’t have to be concerned about panel sizes. Do the layout to avoid ending up with slender pieces at either end of the run. Don’t be concerned about where electrical outlets fall on the panels.
Plan to make your cuts at inside corners and run a bead of caulk in the corner joint. Where two panels meet one another along a wall surface, meet with the factory cut to factory cut.
Apply generous amounts of construction adhesive on the reverse side of the panels. Press the panel against the wall to spread the adhesive and then nail the panels to the drywall. Put the brads into the beads instead of into the flat part of the beaded board.
Use a corner molding for your outside corners. I don’t recommend you miter the MDF. The MDF corners become very fragile. Buy at least one extra panel. When you are thinking about how much material you’ll need to buy. Keep in mind that a contractor plans for at least 10% waste.
Cap rail, Baseboard + Solid Lumber Individual Beadboards (EASY)
This one is made from solid material: individual beaded boards – usually 5/8″ thick. The chair rail needs to cover the end grain of the boards so it should be a back band or perhaps an outside corner molding.
But, you can also make your own chair rail from some flat stock to cover the end grain and project beyond the bead board. Add another molding on the vertical surface to dress it all up. The layout for this material is similar to the layout for the MDF beadboard panels.
Avoid slivers of beadboard either at inside or outside corners. Because it’s solid wood, it will hold up to traffic better than the MDF options. You can miter or butt up the outside corners. However miter usually looks best!
APPLICATION
- Begin by making up your outside corners.
- Miter two boards along their length and glue them together to form a corner. One way to do this is with a folded tape joint.
- Cut the boards, lay them down side by side with the miter points against each other and masking tape holding them.
- Apply wood glue to each miter and fold the boards together. The tape will act as a hinge for you and help keep the boards aligned while the glue dries.
- Apply each board with construction adhesive and with toe-nails through the tongue.
- Face nail the the last board.
- And to fit it into place, you can cut away the underside of the groove so that the upper surface can sit on top of the tongue of the adjacent board.
PRO TIP 1: Make the two mitered pieces the same width for a cleaner, continuous look. Let’s say you come to an outside corner and you need to cut a beadboard to 2” wide to finish off that wall. Make the board on the other side of the outside corner also 2” for a symmetrical look.
PRO TIP 2. Sand each of the boards before you install them. It’s much easier to lay them down flat and get the initial sanding done. Less dust in the house is always a good thing!
Chair rail, Baseboard plus solid backer panel and applied rail and stile (DIFFICULT)
This is a more challenging project. And, it’s also the most rewarding. Depending on the detailing and finish, it can add an old world charm or even a Craftsman style look to a room.
What do you think? Want it in your home?
APPLICATION
- Remove the existing baseboard.
- Apply a panel of MDF or birch plywood directly to the wall surface. If the wall is bowed, shim out the panels to form a flat plane.
- Reinforce the joints that don’t fall on studs. You can do this with biscuits or by cutting away sheetrock so you can install blocking and fasten the panels to the blocking. Complete your layout before this. You have to be confident that the joints in the panels will be covered by the stiles.
- The stiles and rails can be done as battens applied on top of the panel. Once the backer panels are installed, the rails and stiles are fastened to the backer panel.
- You can cut MDF and make the rails and stiles that way. But you may prefer to use longer material for your rails. If you decide to use poplar, you will be able to buy material up to 12’ long. You’ll have fewer joints to contend with.
TIP FOR SHAKER STYLE: For a shaker style, add rails and stiles to the backer panel. Sand down the rails and stiles where they meet. Aligning them perfectly is virtually impossible – unless you can make them up in a shop.
TIP FOR TRADITIONAL STYLE: For a more formal style of wainscoting installation, add a small molding inside the rails and stiles.
Pre-made simulated raised panel wainscot. (EASY)
You can find simulated raised panel wainscot made from MDF at a lumber yard, Home Depot, or Lowes.
The most common size is 32” x 48” (height x length). This material is great because it’s so easy to assemble and install!
This is a good option if you have a space where the panels fit perfectly. This material takes a paint finish very well.
There are some disadvantages. Chances are you’ll run into some very visible vertical joints every 48”. Also, you won’t be able to control where existing electrical outlets fall within the panels.
Finally, inside and outside corners can be difficult. Because you can’t vary the size of the panels, inside and outside corners have to be mitered at whatever point they fall in the panel.
EXISTING CONDITIONS
Finally, here are three existing conditions to watch for when laying out and installing wainscot.
SCENARIO 1
In an ideal world the floors and ceilings in your house are level and parallel to one another. Even if the floor isn’t level, make sure the baseboard and chair rail are. Otherwise, the cuts you need to make to do your work might not be 45° and 90°.
You may have to raise one end of the baseboard to achieve a level surface. If that means that you’re left with a gap between the base and the floor, add a shoe molding.
SCENARIO 2
The walls are not flat. If your wall has a bulge in it (and many walls do), this can create some added problems. It can be difficult to get your moldings to lie flat against a wall that is not flat.
If you force your moldings to follow the contours of the walls, you increase the likelihood that the moldings will come loose in the future.
There isn’t one cure-all trick for this condition. Generally speaking, the walls won’t be so bad that you can’t just caulk any small gap between your wall surface and the back of the moldings.
SCENARIO 3
The outside corners where two walls meet, are not square.
This is a very common problem. In a typical house, the drywall corner bead throws the outside corners off square. But, you can easily take this into account when you’re making your miter cuts.
Have fun with your project. And let me know how it turns out!

I have two outside coners that are bullnose
I am trying to use the Pre-made simulated raised panel wainscot. I am running into one problem. I need to use 1 and 3/4 of the wainscot. This leaves me with just half of a rectangle on the end. Will this look strange? Do you have any other suggestions?
Thank you!
Hi Jennifer. This comes up all the time. Sometimes there is only one layout that will work and that might be the case here. But, I’ll try to help.
As a general rule, a smaller space is more forgiving of this kind of eclectic detail than a large one. So, if this is a small space you might find the effect isn’t especially noticeable.
Is the end where you’ll have the half panel an inside corner? If it is, then we might have some options in how to treat the corner. If it’s going to occur on an outside corner, the options are more limited. Please send me the overall dimensions of the space and the dimensions of the panels you are using (or even better, send along a link to the product).
what is the term whiskey rail as applied to flat cap rail in wainscoting or is it a regional term
Interesting question! I don’t know the answer but I can so easily imagine that it got that name because it provides a handy surface to rest a shot glass.
I want to put wainscoting in my laundry room. I have an outside door that opens and goes down to the basement in that room. I plan on putting wainscoting on the wall next to the door and taking it down the steps. The problem I am facing is there is a step up into the laundry room and the wainscoting will be at different heights on both sides of the door. I am wondering if this will look alright or if I should only put the wainscoting on the wall going down the stairs.
You’re right. In your case forty-one inches is higher than you’d ideally like for wainscoting. You have two options. First, you probably have an apron beneath the window stool (I should explain that a “windowsill” is on the outside of the house and a window stool is that shelf that’s on the inside). You can probably work out a decorative way for a piece of trim to rise from the top of the wainscot to the underside of the window stool. Second, (and the one I prefer) consider lowering the wainscot height to 29” or so. That way, the distance between your window stool and the top of the wainscot becomes large enough that they don’t have to interact and it doesn’t look like a design error.
It’s not unusual to have wainscot at two heights especially when interrupted by a door, a cased opening or a stair. Go for it. Try to avoid having the baseboard just miss some alignment with an element such as a rail, a handle, a hinge or a panel on the door. If you want to get a sense of how it will look, take some blue tape and set it at the two different heights. Live with it for a couple of days. When it’s done right, it’ll “look like it grew there”.
Hi, thank you for your article. Wondering if you can help me with a question that I can’t seem to fine an answer to regarding wainscoting. I want to put it in my living room, hallway and downstairs loo. My walls are about 8 feet tall and in my living room my window is about 41” from the floor. I have no idea what to do because that is way over the 1/3 rule. How would you tackle this? And would you also do coving at the ceiling? Do you think you can leave some rooms without wainscoting such as bedrooms etc…
this is exactly my issue! Hoping for an answer on this! Can’t seem to find pictures of this situation either. It seems in bathrooms with windows that high they choose the 2/3rds from the floor option.
Can I do a box trim mounding in my entry way with wallpaper on top half? Just the full wall. Is there a rule of thumb for that or will I need to do test of walls?
Sorry no one got back to you. I do a lot of remodeling, and here are my thoughts. I’m not sure what the window problem is. If you are saying your window sill is 41″ from the floor, there is no problem. Simply run the wainscot under it. It does not have to intersect your windows. Choose the height on the overall look for the room. Coving goes great with wainscot. Just don’t use a skimpy cove. It should compliment any moldings on your wainscot and be heavy enough to balance the look top-to-bottom. You do not have to wainscot every room to make a good flow. It is traditionally placed in hallways and formal and semi-formal rooms–dining room, living room, dens and office space. It is not at all unusual to do some of those areas, and not others. Nor is is unusual to skip bedrooms and bathrooms, or use a different style in a bathroom than in a formal dining room. I just finished an open concept home and we did the two walls (and small entryway divider) with wainscot, and none in the entryway or living area, or kitchen even though you can see all those rooms, It looks fine defining the dining area from the rest of the “areas”.
Thanks Chaz.
Agreed wainscot is usually reserved for formal or semi-formal spaces. Though it’s worth mentioning that in really old houses there was a time when painted bead board seems to have been used where the owners wanted a cleanable surface.
I think this may be why wainscot has continued to be popular in bathrooms. At one time painted beadboard was used at a time when ceramic tile was beyond the reach of most people.
Hi Laura
Apologies for the delay in getting back to you!!
First thing, run some blue tape around the room at various heights to see if it seems to lower the ceiling.
Wainsoting is generally more elegant when it’s slightly higher than the windowsill. But if that height seems to lower the ceiling then reduce the height. You can design the wainscot to terminate at the same height as the windowsill so that the sill seems to be a continuation of the wainscot. Or keep the wainscot a few inches below the sill.
The point is to make these decisions appear to be very deliberate choices.
Hi Kevin
Thanks for the great article, just what I have been looking for!
What thickness of birch plywood would you recommend in making the batten and board Shaker style Wainscot? Also, how does one deal with the baseboard now sticking out the extra thickness of the plywood behind it when it meets the door trim? Thank you!
Hi Wendy. Glad you enjoyed the article. There’s no simple answer to your question. But here are the various issues to consider. For stability, I’d use 3/4″ birch. That may result in a thicker rail and stile look than you want. But you have the option of building out the panels in between the stiles to achieve a smaller recess between the plane of the stiles and the plane of the panels. Now to baseboard. You’ll need to remove the existing base and reapply it on top of the wainscoting or do without base and make the wainscot serve as base. If you apply baseboard against the wainscoting you may find that it’s now going to be further off the wall than the trim around your doors. One way to solve that is to cut your door casings and add a thicker piece called a plinth block. Hope this helps.
I am wanting to put wainscoting ina hallway which makes a left hand turn. Therefore, when making the turn the facing wall is longer than the wall on the right after the turn. How do I get the panel spacing even so the stiles are directly across from the stile on the opposing wall. that
Hi Roy. This comes up all the time. I think you will find that the stiles on one wall don’t have to match the stiles on the other. But if that’s an important consideration for you, make the first panel after the inside corner as long as the hallway is wide.
This can become an issue if you have artwork frames to hang and you want them to be spaced to center on a panel or a stile.
Good luck with it!
How does beadboard or wainscoting compare with putting up Sheetrock. Taking into account Sheetrock has to be tape and floated and painted?
With the price of lumber today, do you have any idea?
Hi. Already have baseboards and railing at the appropriate heights. the space in between the two is 30″ – looking for a rule of thumb as to how high the frames should be (ie: how much space do i leave on the top and the bottom) – should it be 2/3rds? – that’s the one proportion I cannot find the answer to.
Kevin
We’re putting wainscoting in our bathroom, on the wall where the window is. Floor to window sill is 40inches, 8 foot ceilings. If we go floor to window sill that’s more than the 1/3 rule. Also do you suggest wainscoting to contain on wall behind the vanity?
I am interested in putting up Wainscot in my bedroom but not having it throughout my house. Would it look weird only being in one room and not the rest of the house?
Hello!
I’m trying to install my own wainscoting in a nursery. There are three walls it would go on, the 4th is pretty much entirely closet doors. One wall is shorter than the other because there is a doorway to the bathroom that cuts it a bit short. I was going to use premade 28″ Ashford Rectangles because I don’t have a miter saw or carpentry skills. The article said not to change the length between the picture molding. Does that rule apply to each wall or the whole room. In order to apply them to the shorter wall I would need to put them a bit closer together than the larger wall (about 2-3 inches closer). The walls are opposite each other. The third wall has a large window that comes down pretty close to the floor so I will have to go “through” the window, so I was going to center one picture molding on each side of the window. Will that look strange? What would be a better solution if so? Thanks!
Question. I currently have wainscoting in my home and have just replaced the flooring. There are a couple options for the gaps from the wood floor install: add quarter round to the base of the wainscoting. or baseboard.
Which do you suggest and is there a right or wrong?
A shoe molding is a slightly different shape than a quarter round. The shape of the shoe mold may be more pleasing. you can also use a small piece of lattice such as 1/4″ X 3/4″. The rectangular shape can complement a wainscot very well.
Hi
We’re moving into a home with a dining area adjacent to a family family room that is 2 steps down.
The ceiling height is the same in both rooms
Can we do a wainscoting treatment across the entire width of the wall even though the family room portion would be longer
Of course. A simple, clean, design with dominant vertical lines may suit best.
Hi! I want to install wainscoting throughout my entire entrance including a small hall leading to a bathroom. My issue is one side of the hall contains a coat closet and the design that so had in mind (3 picture frame moldings progressively smaller) won’t fit on either side or the coat closet. Should I skip that wall, skip the whole hallway, or use only 1-2 of the moldings on that wall while using 3 everywhere else. Also, for outside corners that at not square/ 135 degrees, should I wrap the design around the corner if that’s where it lands, or should I adjust the size to each section of the wall so that the design is consistent, but the size is different?
I’m attempting to do a stairway with bottom corner stair ,then 5 steps up to a 41×39 platform.Then turns to right 7 steps up to bedroom hallway.
I’ve seen Cap Cod 1/4 inch x 96 inch at home depot ,but they are all curved and bent.
I would consider using this if they came 48inches,but in general ,isn’t it easier to work with a thicker individual ,tongue and groove.
Hi Kevin,
Thanks for the article. I am planning to install a shiplap on the right side entry wall all the way up to the ceiling (around 19 feet high) and a 42″ wainscoat on the left side. Is it unusual to have different types of wainscoat facing each other?
Thanks
Hi Susan
Unusual but not unheard of. And an Entry is a pass-through space – prefect for this kind of eclectic detail.
Hi Kevin,
We are using picture frame molding for wainscoting in our powder room. One corner of the room is clipped, so that there are two “corners” that have an angle of about 145 degrees. If the spacing we’re using is 3″, should we also use 3″ to this corner on both wall faces? I’m thinking that it’ll make the space between molding look too large. Thanks for your help.
Hi Jeanne. I can see why that might make the spacing seem too large. When I need to make decisions like this I often find it helps if I mock it up first. This can be as simple as using some blue tape to simulate the vertical lines in the corner.
Good afternoon Kevin. I’m planning on installing wainscoting similar to your craftsman picture above (the one where you make the comment – “Here is an example of a very detailed batten-board wainscot. It breaks the ⅓ rule. Small and large panels are strategically placed on top of each other to create the overall height. All electrical outlets were placed in the baseboard below the panels to avoid any conflicts with panels or stiles.”
The wall that I’m doing the installation on has 3 door openings (laundry room, closet, and bathroom). The wall space between the laundry room and closet is very narrow. I’m wondering how you might tackle that issue. I’d love to send you a picture if you’re willing to give me your email address.
I have a problem with paint cracking and need to cover it. I would like to do wainscoting up 2/3 of walls. I would love to do all white, however, my doors and trim are done in pine and stained a medium pecan color. the cathedral ceiling has beams with the medium pecan color as well. Can I do that and use a floor trim on top of the in a medium pecan color in order to tie it together. Or would this be a big decorating error?
Hi Kathy. To say it would be a “decorating error” is taking it too far. I can think of downsides and upsides. The darker color trim at the top might create a line that tends to reduce the perceived wall height. But, why not try it anyway? You can paint over the stained wood if your first option doesn’t work. Hope this helps!
We have a room that is one step down from the entrance way. The wainscoting in the entrance way is one height. Because of the step down in the living room, if we keep the wainscoting the same height, then the wainscoting will change height at an outside corner. Have you seen this before? I cannot find an image online anywhere. I need to know what a transition from a higher wainscoting to a lower wainscoting at a corner is supposed to look like. I wonder if we should make the living wainscoting really high? Our ceilings are high so we could do that. Do you have any suggesting re: how to transition from a high to lower wainscoting that would look good?
Hi Suzanne
Great question! The most frequently used method of changing height, especially at a step or stairway transition on an outside corner is to create a vertical step down. Depending on the specific type of wainscot you’re using this can be tricky -especially if it involves creating a vertical miter on the outside corner.
Hi Kevin,
Thanks for posting all this useful information! We installed the chair rail with picture frame molding and it looks amazing. Now it’s time to paint everything and I’m not sure which finish I should use on the picture frame molding. The walls and molding have been primed. I painted the chair rail with a semi gloss and the walls will be an eggshell finish.What do I paint the picture frame molding with? Should it be a semi gloss or eggshell?
Hi Lynne
I take it that you’re using the same color and the sheen is the only question. From your description, I’d use semi-gloss. Lately it seems the design aesthetic is getting away from using semi-gloss on large moldings like door and window casings and using semi gloss on small design elements. Like all such things there’s no hard-and-fast rule of course!